How to use Gmail labels to organize your inbox
How to organize your inbox to be more effective . You can create labels that store your emails. Add as many labels as you want to an email.
As a business person, you rely on email. Your messages contain requests for work, invoices, client questions, and more. It’s only natural that you would spend a good portion of your time working with your email messages.
Some of that time you spend on email messages could be better spent. How many times have you searched your Gmail inbox to find a lost message? Have you ever placed an email message in the wrong label?
Maybe you’ve even accidentally deleted an important message. If you waste time dealing with all these email chores, you’re not alone.
What if you could learn to spend less time on your email and accomplish more at the same time? With Gmail, you can organize your inbox to be more effective. You can improve your email inbox so that you can find your messages quickly. You’ll never have to worry about a lost message again.
Everyone’s email needs are slightly different. Once you understand how Gmail works you can pick and choose the features that work best for you.
In order to create a Label, you need to follow the steps below.
How to Use Labels :
Step 1. Create a Label
You can find the Label tools beneath the Circles label on the left sidebar of the Gmail screen. You may need to click More to see it.
(Note: Labels are different from folders. If you delete a message, it will be erased from every label that it’s attached to and your entire inbox.)
- On your computer, go to Gmail.
- On the left, scroll down, then click More.
- Click Create a new label.
- Name your label.
- Click Create.

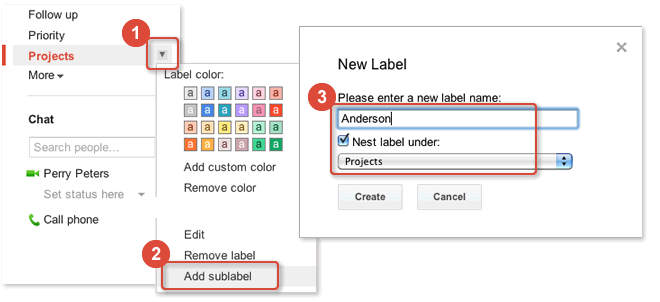
step 2 . You Create a nested label
Now let’s create a label nested under Projects. Again, you can do this in a few ways, but easiest is to point at the Projects label and click the down-arrow that appears (1). This opens a menu where you can choose Add sublabel (2). A window pops up where you type the name of the label (3). Since we’re making a sublabel, Gmail has already selected the option to nest the label under Projects.
step 3. Apply a Label to an Email
To apply an existing label to a new email, first, open the email. Click the Label icon (it looks like a label) at the top of the email to open a drop-down label menu.
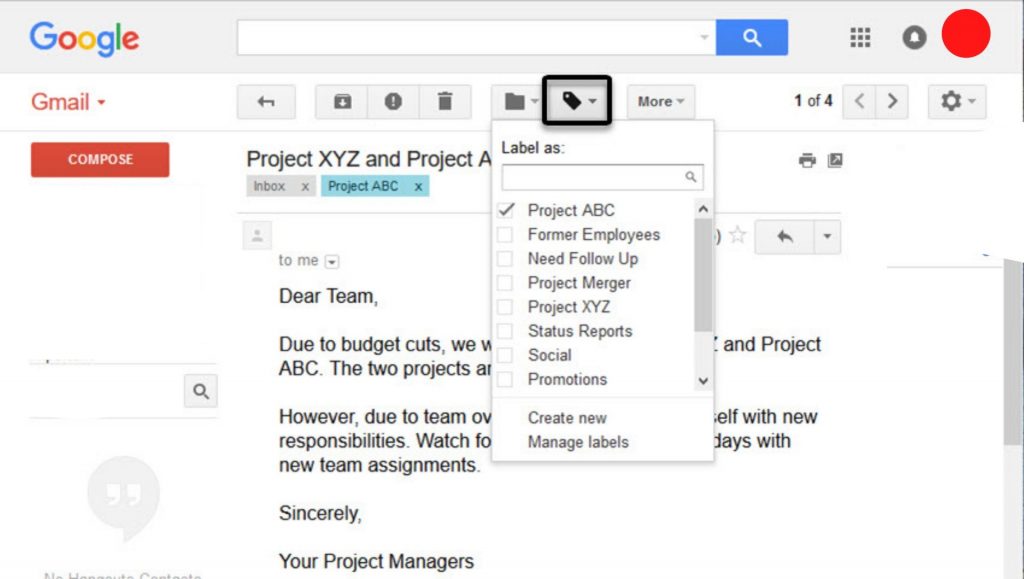
Click the name of the label you want to apply to the email. You can also click the Create new option to open the New Label box and create a new label for the email.
Step 4. Color Code a Label
A great way to organize your inbox is to apply color-coding to the labels you create yourself. This allows you to quickly see how messages are labeled at a glance.
As you pass your cursor over the right of the label you want to apply color coding to, you’ll notice a small down arrow.
Click the color of your choice to apply it to the label.
Step 5. How to Manage Gmail Labels
At the bottom of the Labels sidebar, you will find the Manage Labels option. You may need to click More to see it.
If you click this option, the Labels Settings screen displays. (You can also access the Label Settings screen by clicking the Settings icon and then clicking Settings>Labels or by clicking on the Labels icon at the top of an open email message and clicking the Manage Labels option.)
Use the scroll bar on the right side of the screen to scroll through the list of labels.
At the top of the Label Settings screen, you’ll see the System labels. These include labels the Gmail system has defined for you such as your Inbox, Sent Mail, Drafts, Spam, and Trash.
Below the System labels, you’ll find the Categories labels. If you use Google+ social media, your social circles appear below that. At the bottom, you’ll see the labels you’ve added yourself.
Besides each System label, you’ll see two or three options beneath the heading Show in the label list. The first two options, show and hide, allow you to decide whether the message label appears in the label list on the Gmail sidebar. If the show is selected, the label is visible in the list. If the hide is selected, it is not. Some labels have a third option, show if unread.
The Categories labels, Google+ circles, and the labels you’ve added yourself also have a column for Show in the message list. You can show or hide messages with those labels. In addition, the labels you’ve added yourself have an Actions column that allows you to remove a label or edit the label (rename it).